
Art is a common hobby enjoyed by many. It’s something that everyone has done at least once in their life. I personally have always loved it, whether it is doodling for school, or just for pure fun. However, as a junior, I’ve been struggling to find time to do what I used to enjoy, so with this opportunity to write about something that I’m interested in (and being heavily inspired by this article), I decided to see what I could do to become a better artist. I will cover aspects of art utilized by many artists and how I’m going to improve my drawing skills, and how you can also hone your skills.
How to Sketch and Line
Sketching and lining are some of the most important aspects of drawing. The sketching phase establishes the scaffold that the rest of your drawing will be based on. Sketching can help you visualize your ideas and help you decide on certain aspects that you may want to keep or discard. Additionally lining helps to finalize the sketch and make it “pop,” as well as opening the pathway to colors.
To sketch properly, you would ideally start with your tools. Depending on the type of graphite (if you’re a traditional artist), how you sketch may change drastically. “H” pencils are the hardest pencils and are used to sketch thin, light lines. “B” pencils are softer and are used for darker lines and shadows. “HB” pencils are the standard #2 pencil, perfectly in between “H” and “B.”
Now, to start sketching, you must hold the pencil loosely. Holding the pencil near the tip with a tight grip can result in dark lines, as well as indents which may remain on the paper even after erasing. Holding the pencil higher with a loose grip results in smoother and lighter lines.
Use simple shapes with very loose lines, as you can find what shapes you want, as well as make it easier to erase if you make any mistakes. Varying both line thickness with hard and soft edges can result in more pleasant images which can also emphasize certain areas further. You’d ideally want the focus of the drawing to be two-thirds of the canvas.
Lining or inking is the use of ink or darker shades to emphasize the shape of the drawing. This process can be used to refine the drawing, but also to show the clear lines in drawings when other colors are added.
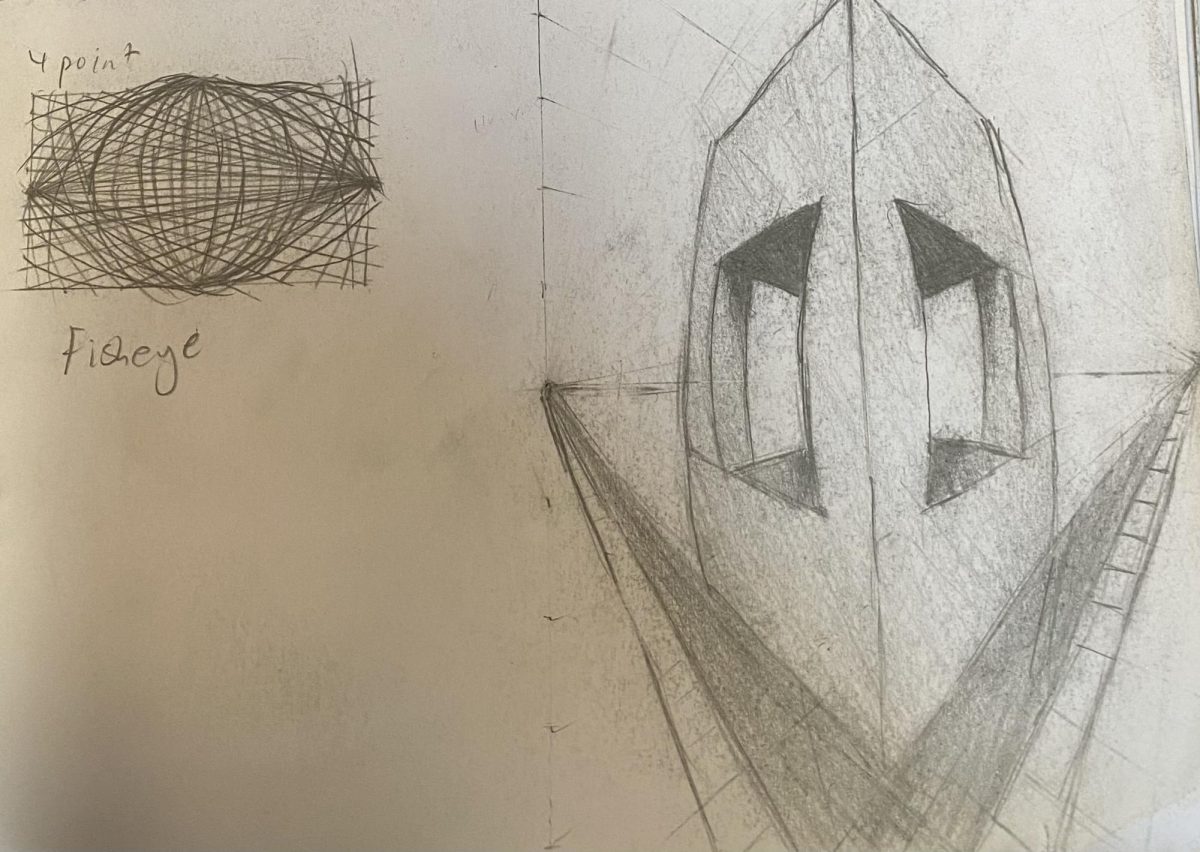
Learning Perspective
Perspective is the art of drawing on a two-dimensional surface to give the right impression on the height, width, depth, and position of the object — a technique also known as drawing in three-dimensions. There are many different types of perspectives an artist can choose from. The single point perspective has one vanishing point. The two point perspective has two vanishing points (usually located on the far right and left). The three point perspective has three vanishing points and so on until the six point perspective where we usually draw the line (pun intended). The process of drawing these lines creates a grid system that allows you to draw shapes in respect to perspective with ease.
Drawing perspectives is surprisingly simple with the use of a ruler. First, draw a vanishing point and using that vanishing point, draw multiple lines all connecting at the initial point. These are the guidelines you can follow to make sure that our drawings are in the correct perspective. You can use these guidelines to draw things like a long road, a corner of a block, the city from a bird’s eye view, or the city from an ant’s eye view.
From four points of perspective and beyond, the process slightly changes. You would draw the vanishing points in the same way, but the top and bottom vanishing points would not be straight lines. Instead, you’d draw curved lines expanding outward and having multiple intersections between the lines with the two vanishing points at the top and bottom instead of the usual one for three point perspectives.
The five point perspective adds a focus in the middle of a four point perspective, while the six point perspective adds two focuses. This results in many depictions where a six point perspective shows the front and back image of a surrounding.
A different perspective and angles can result in a completely different feel to a particular drawing as well as emphasize certain aspects of it. An angle looking upwards can emphasize the sheer scale of objects like mountains or buildings, while an angle looking downwards shows objects shrinking.
Studying Anatomy and Proportion
Anatomy is one of the most difficult aspects of art. Whether it is drawing humans or animals, capturing the precise proportions of creatures is truly a challenging task. However, this can be overcome with a very simple method, practice. Unfortunately, despite what many videos may claim, the only way to actually get better is to constantly practice (or make a deal with a supernatural power).
Anatomy is all about memorizing how each part of the body looks in different perspectives and applying that knowledge into your drawings. Though, there are ways to make the process of drawing anatomy easier. You can still use the grid system you made for perspective and draw 3-D boxes to draw out the body in simple geometric shapes. This allows you to get the proportions and poses without having to consider the shapes of each individual body part. After you have a pose that you like, you can start to carve the 3-D shapes to start resembling the human body.
The way you draw anatomy is up to you. It depends on your drawing style, so there is no wrong way to draw. Pablo Picasso, for example, abandoned the more intricate details typical of realist artists in his later paintings, instead shifting into a more abstract and child-like style of drawing. However, it’s still a great skill to learn how to draw accurately in many different perspectives and poses. This skill can help train you to flawlessly draw whatever you want, directly from your imagination.
Lights and Shadows
In drawing lights and shadows, you must first consider the location of the light source. Light travels in a straight line. Thus, if the sun is overhead and you are wearing a large circular hat, your shadow would look like a giant circle. After determining the location of the light source, you now have to consider the surface the light will be in contact with. For objects like a sphere, about half of the image will be under the light, and the other half will be devoid of light. When drawing this, you would indicate a line where the light ends and the shadow begins.
After considering the position of the light and the shape of the object, the next step would be to reflect on the material. Obviously, different materials react differently to light: shiny things like metals reflect more light, while certain objects, like a box covered with black paint, would absorb light. You also have to consider how the reflection works. Metals may just reflect light, but also the surrounding scenery; meanwhile, objects like glass reflect light and the objects nearby. Some objects are translucent and you’re able to see the objects behind them.
Shade from light to dark using light strokes or blend using special tools to create a gradient. The gradient is weakest at parts with the most light and strongest at areas with the least light. The lightest part where light makes direct contact is called the highlight, while the part where the light makes semi-contact and blends the light into the shadow is called the halftone. The last thing to consider is reflected light. Different from reflections, reflected light is the light shined onto the object by nearby scenery.
Different settings also result in different kinds of light. For instance, a classical music concert would have yellowish lighting, while a day at the beach would have sky blue lighting. Natural light almost always reflects the color of the sky, thus at different times of the day the color of sunlight would change. Interestingly, in settings where there is a lack of an atmosphere, like space, light doesn’t have a color. Light will also always adopt the color of the object it’s being reflected off of, or being shone through. The way of drawing light or a lack of it on complex shapes can really be a headache.
How Colors Work in Harmony
Color theory, the color wheel, and color harmony may be some terms you may have heard before. Color theory is a practical combination of art and science, often used to determine what colors look good together. The color wheel, first invented by Isaac Newton in 1666, was an image that mapped the colors and their respective color spectrums onto a wheel. Colors that are visually pleasing together are called color harmony.
Primary colors in the RGB (red, green, blue) spectrum are ones that when combined together form white light. And colors in the RYB (red, yellow, blue) spectrum are ones that can’t be formed by combining other colors.
Secondary colors are colors formed by mixing primary colors together. The secondary colors in the RGB wheel are cyan, magenta, and yellow. The secondary colors in the RYB wheel are purple, orange, and green.
Tertiary colors are formed by mixing a secondary color with a primary one. The RGB wheel’s tertiary colors are orange, chartreuse green, spring green, azure, violet and rose; while for the RYB wheel they are red-orange, yellow-orange, yellow-green, blue-green, blue-violet, and red-violet.
Shades are colors made by adding black, tints are made by mixing colors with white, and tones are the ones combined with gray.
The colors that are opposites of each other, or complementary colors, work best together. This method is called color harmony and can create a very pleasant feel. Using complementary colors is one of the best methods to pick colors for your art.
The Execution
We have gone over sketching, perspective, anatomy, lights, and colors. Now, it’s time to actually start drawing. The first thing you have to consider is what you’re going to draw. To decide this, I usually write out aspects of the drawing like location, time, perspective, and action. In one case, my plan came out to a character in the forest near a river playing the guitar at noon. I then decided on the medium I was going to work on — a digital canvas. With this, I started sketching my ideas on my iPad.
I drew a basic sketch of a forest and the river. I didn’t add many details, as I intended to do so when I started coloring. I drew a very small sketch that I would eventually scale up to an actual canvas size (17 inches by 11 inches).
After the sketch, I made a grid to make proportionally drawing my character in line easier. With a grid, I can draw 3D rectangles to make a simple rig that I can carve away and add details on.
I only lined up my character as I didn’t want to draw thirty different trees. I lined my character with a very thin pen and excluded shading, as lights and shadows would be done later, along with colors.
After I had everything lined, I used one of my brushes to color in my line art with a basic color and void of detail. The background is generally painted in with a simpler palette.
After painting the basic colors, I started with the small details in the background: the leaves, the little shrubs, the animals, the sky, and the river. This is called rendering. You layer small details constantly until you feel that it’s done.
Finally, after finishing the background comes the rest of the details. I rendered the character and the cabin to make sure that they really popped and the shadows and colors looked realistic. After they are up to my standards, I layered the entire drawing with a bluish-white color to make the whole drawing give the feeling that it’s noon on a sunny and semi-cloudy day. That’s about it. If you get these key points down, drawing something should become easier. Art in the end is all about practice and constantly learning how to do certain things. During the research and writing of this article I practiced a lot, and I think that the final result looks pretty good. I watched many videos on art and the two channels that I think helped the most are Marc Brunet and ttpo. I hope this article can help you become a better artist.
I decided to see what I could do to become a better artist. I will cover aspects of art utilized by many artists and how I’m going to improve my drawing skills, and how you can also hone your skills.