Blank Cards: How Do You Create a Card Game From Scratch?
A step-by-step instruction manual covering research, conceptualization, design, testing, and polishing.
Card games are a long-standing form of entertainment, whether one plays the western game of poker, the eastern game of Hanafuda, or the global game of Yu-Gi-Oh. Played worldwide by millions of users, card games have ingrained themselves into our media and culture. But how are these games made? Do you start with a theme, similar to how Hanafuda was designed, with the artworks of flowers and the seasons taken into consideration? Or do you start with a mechanic like Yu-gi-oh, which uses multiple decks and a zoned playing field? Let us figure this out together, and go through the steps of constructing a card game.
Research Phase
The first step of designing a card game is researching existing ones, which will provide you with invaluable information on how and what to design, by allowing you to cater to the likes and interests of players.
For the card game that I designed, the research phase took around 6 months. In this process, I played trading card games such as Magic The Gathering (one of the oldest TCGs with one of the biggest player bases), digital CCGs like Legends of Runeterra (a digital collectible card game made by Riot Games), as well as tabletop card games, including Terraform Mars and Love Letters. By playing these games, I was able to get a grasp of how these card games are different from each other. In this phase, I also looked at how specific games have evolved over the ages and the many problems that players have had with the current iterations of these card games. This method follows the players and allows you to understand what people truly want to play.
A more scholarly version of this process would entail reading game design books and game design blogs. Great examples of game design books and blogs include The Art of Game Design: A Book of Lenses by Jesse Schell, Mark Rosewater’s Blogatog, Making Magic, and Hearthstone design team’s articles. These articles and books often bring you tried-and-true methods regarding game design. Whether it is the bottom-up card design used by the Magic the Gathering design team, which entails a design philosophy of balance/mechanics first and flavor second, or Hearthstone’s unique class identity model, these sources will always bring you some tidbits of wisdom. However, this process does focus on the developer’s insight and what they have at the end, rather than the exact wishes of the card gaming community.
Another way to get through this stage is by watching game designers’ interviews and presentations. This method includes watching web series such as Extra Credits, a YouTube web series that dissects game design, and Escapist’s Dev Diary, which follows a game maker’s journey in creating a game. GDC’s creator presentations, such as Twenty Years, Twenty Lessons Learned, which explores the many lessons that a game designer went through in his 20 years of designing card games, also works as a great source of information for design philosophies and guidelines. This approach is often the most direct, as it shows you the developer’s process and what you need to know in order to progress with your designs.
All of these methods are very distinct and work for different people, but sometimes it takes a mix of all three forms of study, in order to understand what you are making and how it all comes together. Then, when it all said and done, you can move on to the next phase, that of conceptualization.
Conceptualization Phase
Now, we reach the hardest and most important phase of card game development, the conceptualization phase. In this phase, the discussion transitions from the accomplishments of others to the accomplishments that you yourself will attempt. Some things that need to be done include designing the basic mechanics of the game, the set-up / rules, as well as creating the complex core game mechanics of health totals, resource counters, playing fields, and card types.
For the first step of the conceptualization stage, you should invariably know your target audience. You need to determine who the game is for and create game mechanic complexity in order to match your demographic. For my game, I chose to pander to a younger demographic that would encompass both teens and young adults. This would mean that the base mechanics of the game would require a more complex, but not overbearing, tutorial, introductory phase, and a common theme that would resonate with the intended age group.
In my interviews with the Tabletop Club, I found out that this type of simple complexity often draws people in. “It really depends,” said Justin Cheng ’23. “For me, it brings me in. The only case where it does repel me is when it uses a paragraph of text or when it does get to a point where it’s just complex for the sake of being complex.” Cheng’s enjoyment of complexity comes from forming strategies that are interesting and complex without being hassled by paragraphs of text.
However, if you have a younger audience, you may want a simpler set of mechanics that could be picked up and played. For instance, Candy Land and Trouble are board games made for children with rules so simple that anyone can pick the game up and play. In comparison, if you have an older audience, you can often explore darker themes, more complex strategies, and more levels of play. Examples would include games such as Warhammer 40k and Chess.
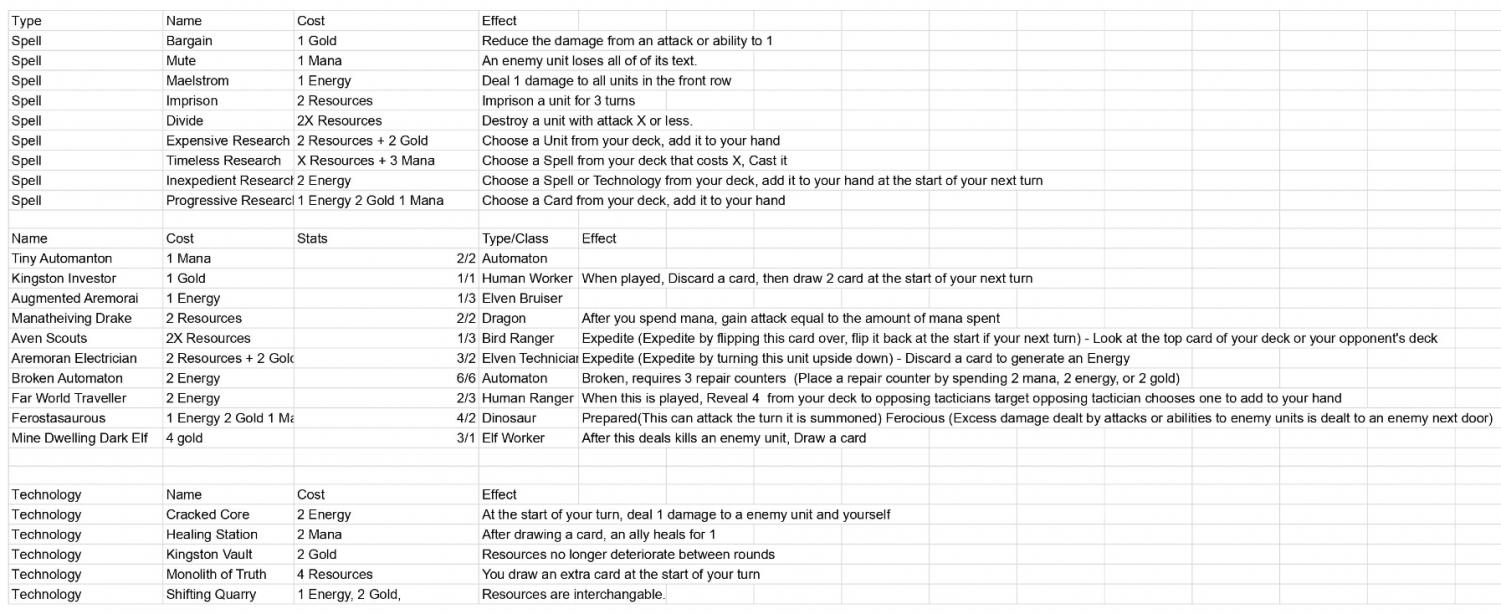
The second step is to design the game mechanics, such as battlefields and game pieces. This step is very important. In a poll that surveyed members from the Tabletop Club and the Esports Club – Bronx Science’s premier club for playing games, statistics showed that 73% of the participants placed game design and game mechanics as the primary reason they play games. In my particular case, I chose to create an army builder-style card game that used three types of different resources (Mana, Gold, Energy), three different card types (Units, Spells, Technology), and a diamond-shaped battlefield. However, in your game, you can choose to not have a battlefield or a resource mechanic.
The final step is the numbers and more technical part of the design, focusing more on how the game is played, the goals, and the rules. In a complex game, rules may span books, or maybe the entire game, with abstract goals and ‘how to play’ instructions that are left for the players to decide. An example of this would be Dungeons and Dragons, where the entire game is based on two rule books. However, in a more simple game, there are usually defined rules that are integral for the game to progress. Winning in these simple games is often more clearly defined; for example, your goal might be to “fulfill x condition” or “reduce the opponent to 0 health.” For the game I made, I chose to define the win condition as “reduce the opponent to 0 health or fulfill a condition on a card,” and piggybacked off of the basic rules of Magic the Gathering as a template for design.
With that, we have a functional template for a game composed of rules, a theme, and a set of mechanics. Now, we can finally start designing cards.
Design Phase
Now that we have a concept for how the game functions and a grasp on the mechanics of the game, it is time to start formatting and designing the cards. In the design phase, you create the thematics, the cards, and the battlefield.
The first step in creating a card is to determine how you are going to create the card. This may sound redundant, but the point is to choose whether you are going to design your first cards around flavor (top-down design method) or unique mechanics (bottom-up design method). Both of these are valid design methods, but it is all based on personal taste. I used the bottom-up design method in my game. While talking with the Tabletop Club, many members stated that mechanics were essential towards explaining why people played card games, but that interesting themes also played a big role in why they pick them up. In an interview, Jacob Rubakha ’22 noted, “Sometimes it would make sense to start with the theme you are trying to build a game for and then think about the mechanics, while sometimes you might come up with a specific mechanic that seems very fun and start with that, followed by trying to encompass that in a theme.” In my case, I had an interesting mechanic for my first card.
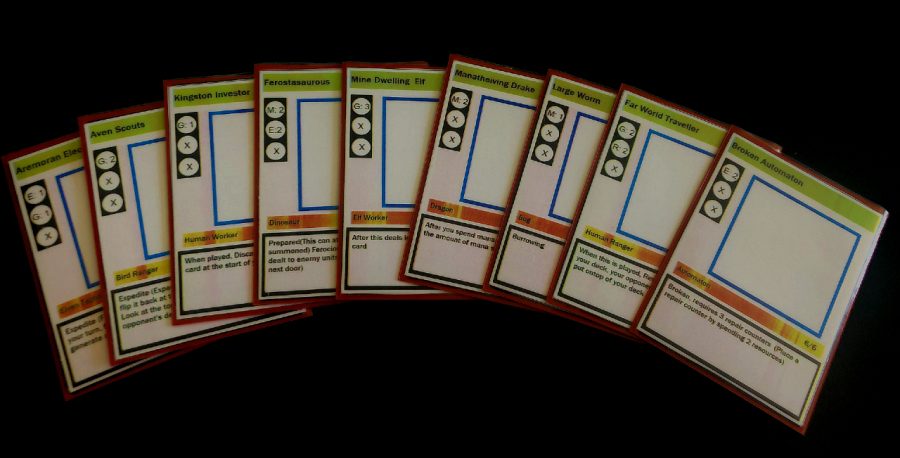
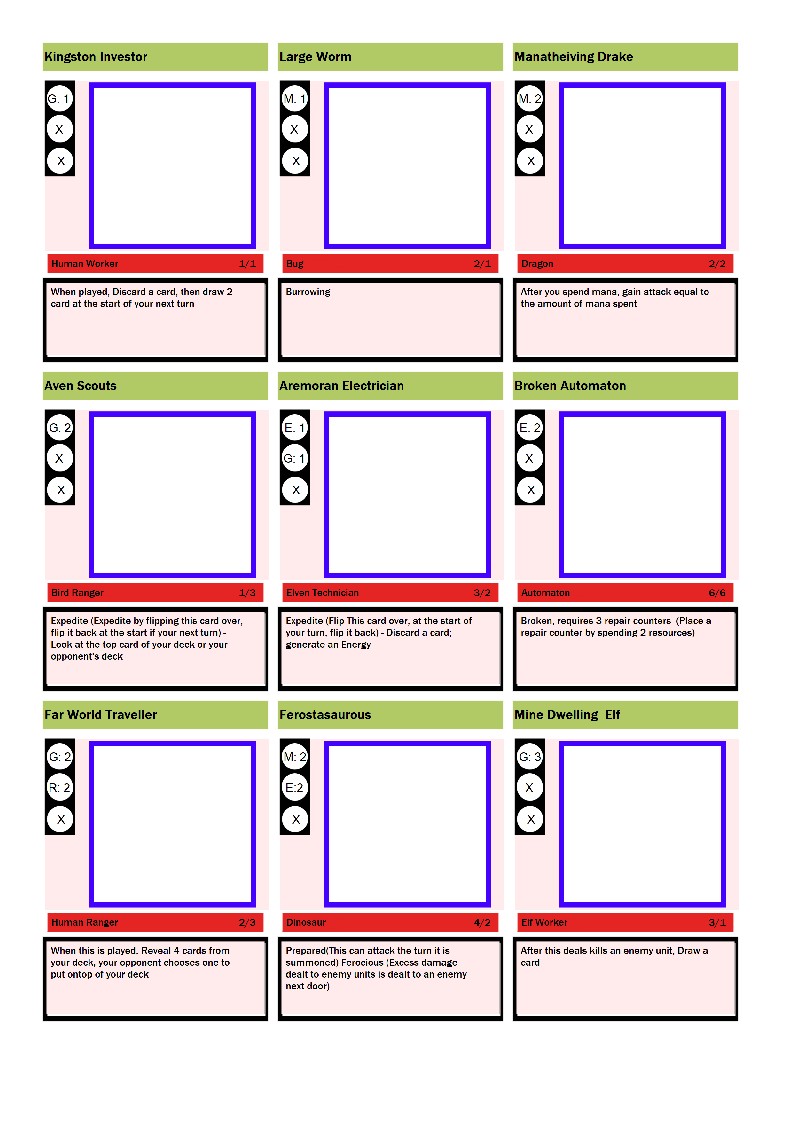
Now, the second step is to create cards in spreadsheets. Now, this may not seem particularly fun, but spreadsheets are often the best tool for card creation; they allow you to list card names, card texts, costs, descriptions, and flavor texts right next to each other. This way, you can create a lot of cards in a condensed space without the need to create a file for each card. If you are creating a more complex card game, you may want to split your spreadsheet into multiple spreadsheets separated by card type, since it would clear out space for you to design each card.
(Tiankuo Zhang)
In this design process, remember to make interesting mechanics for the cards and determine how much flavor is in each card. In card games, the flavor is the card’s theme. An example would be a bird card having a flight-like ability or an archer having a ranged attack. Having an appropriate amount of flavor makes the game more enjoyable and immersive for the player. However, never throw balance to the wayside for the sake of flavor. “Flavor is important, as it keeps people interested in the story and lore, and it keeps continuity and allows things to make sense. But it should never cause balance issues,” said Fiona Zhou ’23.
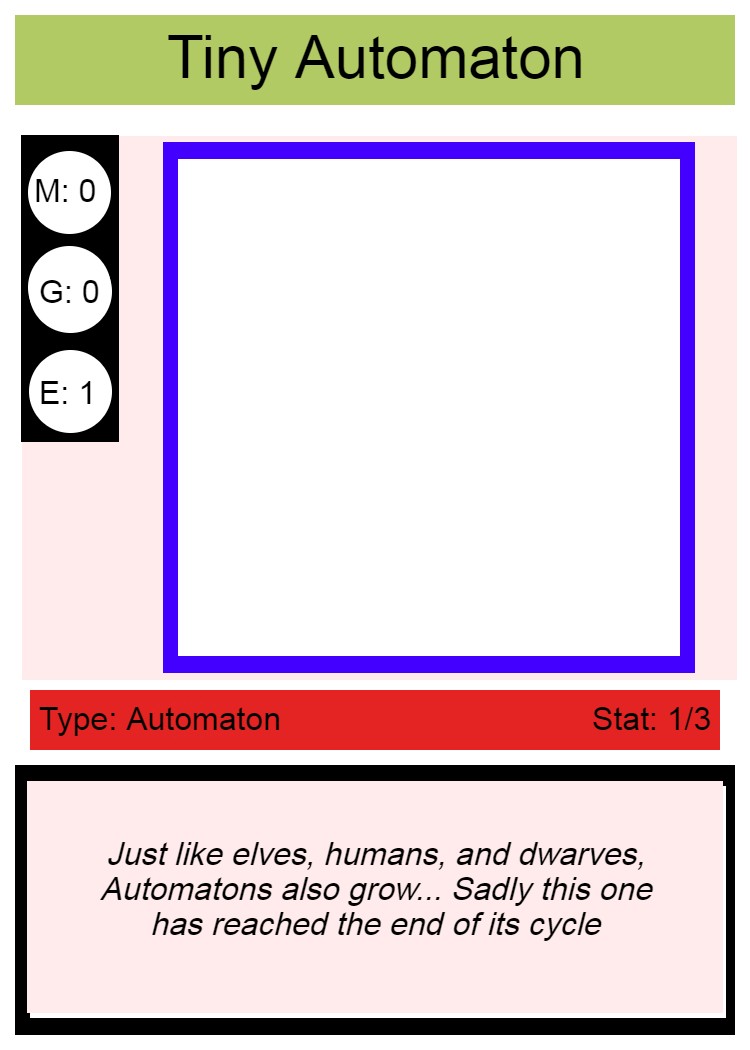
The third step is to create a card template using a drawing application. Creating a card template should follow a few basic rules:
Rule One: The key parts of the card should stand out. This means that the name of the card, the effects of the card, and the cost of activating or playing the card should be distinct and never obstructed.
Rule Two: The color should differentiate the cards. Color is great for card artworks and maybe unique foiling, but the color is key in helping differentiate how the card looks. A great example of this is seen in Magic the Gathering where the five main colors – White, Blue, Black, Red, and Green – are emphasized on cards of the corresponding color.
Finally, Rule Three: Keep the card clean and simple. There may be temptations to splash colorful arrays onto the card in order to make everything look pretty, but as noted previously, when you do this, you are going to obstruct the player’s ability to discern the cards. In the case of the example game, I created this basic template using a GNU Image Manipulation Program that corresponds a color to an aspect of the card. However, in simpler card games, you only really need to follow rules one and two. They usually have less information to convey and are more theme-based; in those cases, the visual style of the card is key.
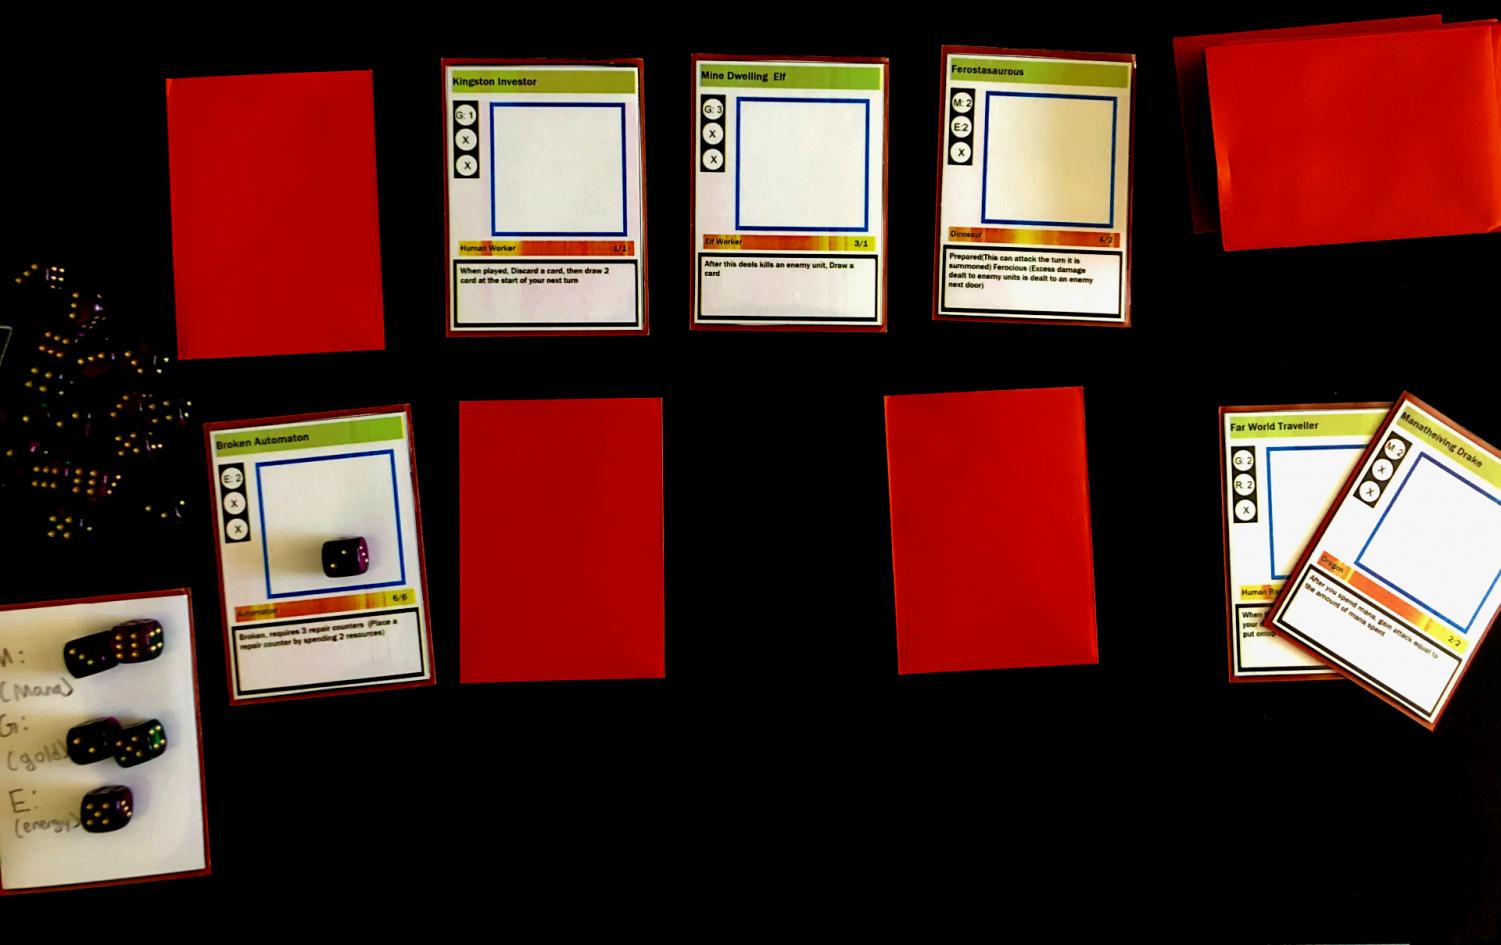
The final step is transferring your spreadsheet data to the card template. This process is usually quite arduous and time-consuming since you are not doing anything new. It merely combines the products of the previous two steps and creates something new. However, the key in this step is to make sizes proportional to standard card sizes to allow them to fit into sleeves, as well as putting in placeholder artwork for the cards to save time. In this phase, all we are going to do is create a prototype. Once you have the cards created, the only thing left to do is to print them on any old piece of cardstock, leaving you with a playable version of your card game. Now, with all of that complete, it is time to test and fix issues.
Test Phase
There is now a functional prototype of the game, and when there is a prototype, there is testing to be done. In the testing phase, the primary goal is to check the game for imbalances, quirks, and the general level of fun.
To do this, you may want to first print out your cards and play with your close friends and family. Let them construct their decks using the cards you have created and play several games with them. The purpose of this step is not to check for issues or balancing mistakes but rather to check for the reactions of the players. The goal here is to make sure that the players are enjoying the game, while maintaining interest for an extended amount of time. Testing for fun is important because it allows you to see whether the game provokes reactions such as joy, excitement, nervousness; those emotions are often indicative of a game being intense, fun, and enjoyable.
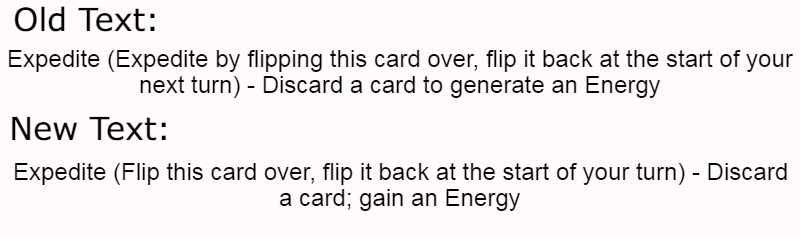
Then, when you finish testing it with friends, try playing against yourself and find overpowered or game-breaking combinations with the cards you have created. This process allows you to check for the combinations that would make the game dull or unplayable. This is also the step where you balance the card game and create common phrasing for cards to allow logical and easier interpretation of the card text. It entails rewriting card effects to make them consistent with one another, choosing specific words to represent certain things, or using keywords to symbolize a certain effect that may be wordy.
The final step in the testing phase is the tournament test where you get eight players, teach them how to play, and then let them create their decks. After that, let those players compete in a small tournament. This allows you to see the meta, or most effective, tactic available and whether they stifle creativity or design space for the players. This is the most important process because, for many players, the ability to create and find innovative ways to make decks is one of the reasons that they play card games. “What really keeps me in was the uniqueness of the gameplay,” said Justin Cheng ’23. “The ability to create unique strategies from the combination of cards and that you’re always in unique situations is admirable.” This shows that unique experiences in gameplay and variety are often what people want. Therefore, if there is a determined meta in your card game, it can create a situation where the game stagnates.
Polish Phase
Once testing is finished, it is time to polish, print, and publish the game. In the polishing phase, you should be fixing the mistakes that you found in the testing phase, replacing the placeholder art from the design phase, as well as changing core mechanics designed in the conceptualization phase as needed.
For my game, I replaced card art that does not seem to fit with the game’s aesthetic, changed card names and text in order to make them more balanced and thematic, and removed parts of the game’s core mechanic. For more complex games, this step would often take more time, as when you change one mechanic in your game, you will then need to restructure your game to make sure that it still holds ground.
Now, once you have finished with this task, you will need to start the printing process. If you are printing the game for your friends, you are going to want to use cardstock, which is sturdy and thick paper, in order to print your cards. You will also need card gloss in order to prevent the cards from scratching or denting after consistent play. However, if you are looking to mass-produce these cards for distribution, it would be more sustainable to pay a local printing shop to do it for you. For my game, I created my cards using cardstock and gloss, allowing me to play this game with my family and friends.
With all of the steps above now completed, you now have a card game that you can play with your friends. You can continue developing it by creating your own expansion packs and engaging with the community. Or, you can work on another card game with another theme and another style. But regardless of your choice, you can always come back to this article and use it as a guide to design your next project.
The first step in creating a card is to determine how you’re going to create the card.
Tiankuo Zhang is an Editor-In-Chief for 'The Science Survey.' He sees journalism as something that has withstood the test of time and finds the transcriptions...