HISTORY OF PHOTOGRAPHY AND THE CAMERA
Photography has a long, rich history that dates back to an amateur inventor named Joseph Nicéphore Niépce (1765-1833) who was inspired by lithography. Lithography is a form of ink printing that uses a slab of stone, ink, water, and grease to duplicate an image. Now, Niépce wasn’t an artist of any sort, so he set his sights on finding a way to print still images without drawing them first. This led to the creation of heliography, a process with a name that means “drawing with the sun.” By exposing a flat plate of silver coated in a light-sensitive solution (bitumen of Judea, a naturally occurring asphalt) to the sun, one could accurately transfer a scene from landscape to metal canvas.
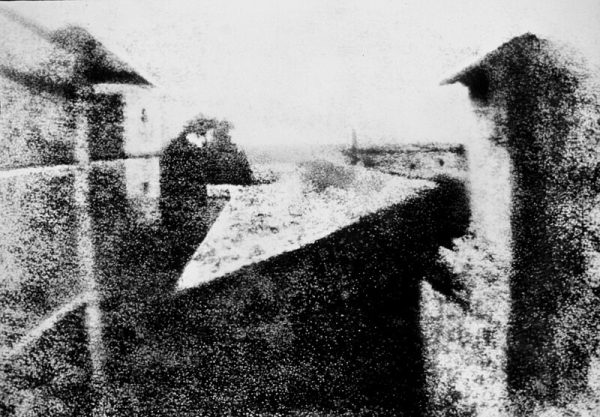
Niépce used this practice to produce the world’s first and oldest known photo. But it took over eight hours for the sun’s exposure to permanently form the image, and was difficult to see clearly. Innovation by Niépce and fellow researcher Louis Jacques Mandé Daguerre led to the creation of daguerreotype in 1838, which was more accurate and efficient than heliography. This method is known as a direct-positive process, because it doesn’t use or create a photo negative. The image comes out on a thin plate of copper, and the image is sourced from a camera. It would take only thirty minutes for the photo to be captured, developed, and toned, so the daguerreotype was leaps and bounds in front of heliography in terms of technological innovation.
In the following decades, daguerreotypes continued to improve. Different chemicals were used to improve image quality, and focal lenses were introduced as a way of cutting down exposure time. But until 1888, photographers were still forced to use glass plates and rigid printing material for photos. It was Georges Eastman, founder of The Eastman Kodak company, who introduced a softer, celluloid roll of film for cameras. Several years later in 1891, physicist Gabriel Lippman discovered a complex method of achieving color photography, and later was awarded a Nobel Prize for this feat. Thus, the race to create color photos was on. Many tweaks and improvements were made, allowing amateur photographers and non-physicists to print in color.
Fast forward several decades to 1962, when a thirteen year old boy named Steven Sasson creates an amateur radio at home. The project quickly landed him in trouble when he unintentionally broadcasted a banned radio frequency and was contacted by the Federal Communications Commission (FCC). But his passion for electronics never faded, and at 24 years old he began working for Eastman Kodak. One of his first projects was to work with the Charged Coupled Device (CCD), a device invented several years prior that could transfer particles of light into data. At the time, CCDs were largely lacking in purpose. Today, a quick search for “charged coupled device” will tell you that CCDs are primarily used in digital photography.
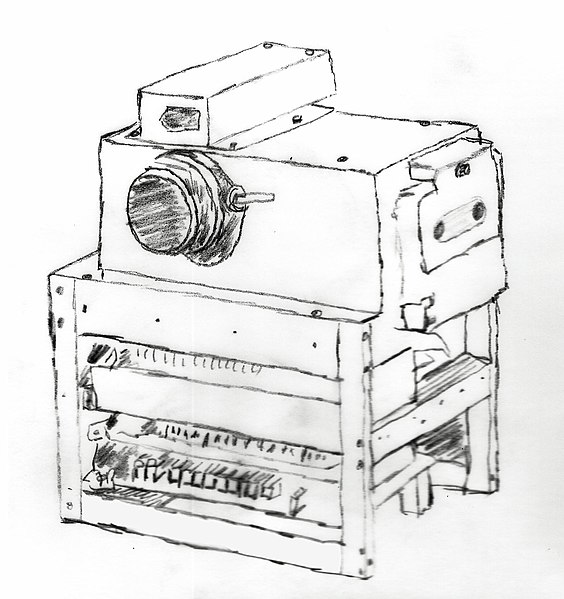
As Sasson worked with CCDs, he began to experiment and attempt to create the first digital camera. His first prototype was large, clunky, and cobbled Frankenstein-style together from other parts. But it was undeniable proof of concept. Regardless of how grainy the image was, it existed digitally. Unfortunately, Sasson’s achievement was soon dampened by his officials at Kodak. They, a team of executives at a film camera company, failed to see the appeal of digital photography. This would lead to the eventual decline in their sales as other camera companies began to market the digital camera. Three years later, Eastman Kodak filed for bankruptcy.
These days, digital photography is everywhere. From always-on-hand phone cameras to retro-style Polaroid and Instax ones, people love to capture a perfect scene to look back upon later.
THE SCIENCE INSIDE
A camera can be modeled with a simplistic machine: a source of light and a small hole. Light will interact with a subject on one side before passing through the small hole. On the other side, an inverted shadow of the object will appear. In order to capture the image, a piece of light-reactive material is placed on the wall where the projected shadow lands. The light-reactive chemicals are exposed to light and a photo is captured.
But this simple light-and-pinhole model has very minimal control over the image formed. A larger pinhole will result in a softer, blurrier image due to larger amounts of light passing through. A smaller pinhole focuses the light on a smaller area, producing a sharper image.
In order to refine the process, lenses are introduced into the system. With a lens, the light rays that bounce around before reaching their final destination can be instantly concentrated and directed in one direction. Adjusting the camera’s lens distance will determine if an image is sharp or out of focus. These curved pieces of glass are also responsible for dealing with magnification.
This concept relies on a physics equation known as Snell’s Law, which explains the relationship between object distance (do), image distance (di), and focal length of the curved lens (f).
Adjusting the focal length by “zooming in” and “zooming out” is what changes the image distance and in turn, the magnification.
For more in-depth information on the ties between science and cameras, you can visit this more in-depth article!
PILLARS OF PHOTOGRAPHY
A professional camera can be intimidating to anyone who hasn’t picked one up before. Cameras have several modes to shoot in, and there’s no shame in using Automatic. But if you’re interested in using Manual, here are some tips to get the exposure just right.
The Aperture, Shutter Speed, and ISO triangle is a key principle that photographers use when adjusting the settings on their cameras. Here’s what it looks like, thoroughly explained.
Aperture can be thought of like a pupil. Camera aperture is to photos as pupils are to eyes. The aperture, sometimes called “f-stop” or “f-number,” refers to the size of a lens, which in turn controls the amount of light and the level of focus.
Aperture is most helpful for adjusting the depth of field in a photograph. A smaller aperture (such as f2.8) will result in a photo with shallow depth. This is one of Mr. Thorp’s favorite aperture settings (Mr. Thorp is the Journalism Advisor at Bronx Science), and he recommends we use it whenever we want to take portrait shots and blur the background. As you increase your aperture, the field depth also increases. With a high aperture (f12, for example), your photos will capture the background in sharp detail, which is great for landscape photography. I set my camera to f12 when I was photographing larger scenes for the school’s Spring Carnival.
However, be careful with extremes. Too low of an aperture can result in a bright, overexposed photo and can blur your subject. Setting your aperture too high will give you darker photos, and sometimes blur the foreground in order to capture the background.
The second pillar of photography is shutter speed. This one is fairly straightforward. A faster shutter speed allows you to capture high-motion scenes, such as a dance of a performance. Shots of the spring musical performance will come out crisp and unblurred if you shoot with a fast shutter speed. Shots from the spring concert would work with lower shutter speed, as the subjects are not moving much.
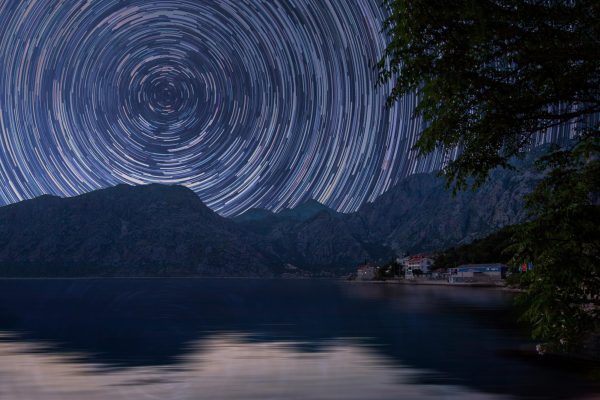
Shutter speed also controls how long or how much of the image is captured over a period of time. One of the most beautiful uses of shutter speed is to set it extremely slow and leave your camera out overnight, pointed towards the sky. Make sure to do this in an area with as little light pollution as possible, and check the weather so you don’t accidentally ruin your camera with rain or frost.
At the end of the night, you should see a beautiful shot of star trails. Star trails can only be seen with long exposure and show shutter speed, because they’re formed by the gradual rotation of the Earth throughout the night. The stars in the night sky shift in a circular motion.
All cameras use a principle called ISO. This feature was developed and named after the International Organization for Standardization, and it regulates how much light is needed for a camera to create an image. The higher your ISO number is, the more sensitive the camera is to light. If you’re outdoors on a sunny day, keep your camera at a low ISO to avoid washing out or overexposing all of your photos. When this happens, your pictures will have large areas where the color and definition of the subject are lost to white light.
Although ISO can be helpful in a pinch, it’s best to adjust this feature last. A high ISO increases the amount of light brought into the frame (good for low light situations) but it also adds noise and grain to your photos, which reduces the overall quality and resolution. Instead, determine the situation or scenario you want to photograph and prioritize aperture or shutter speed, then adjust the rest of the dials.
When you look into the camera, you should see the image you will capture and a small display at the bottom of the screen. This small screen has all the numerical values of aperture and shutter speed as well as a line that will move back and forth as you adjust the dials. The moving display can help you find the perfect balance between your settings. Set aperture or shutter speed, whichever one matters more to you at the time, and adjust the other one until the line “disappears” or cannot become any thinner.
Best of luck to anyone who picks up a camera, and remember to have fun and experiment with the medium!
A camera can be modeled with a simplistic machine: a source of light and a small hole. Light will interact with a subject on one side before passing through the small hole. On the other side, an inverted shadow of the object will appear.

